My Siebe Gorman 6 Bolter
By John Osmond
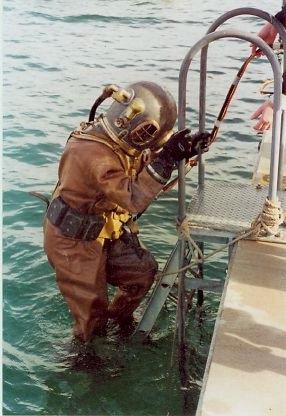
I didn’t care if it was a six or 12 bolter when I heard the news that a Siebe Gorman diving helmet was sitting on the floor at my mate’s place waiting to be picked up. It turned out to be a six bolter. I believe it’s an ex-Melbourne Ports and Harbours’ helmet which has been used for the shallower maintenance and wharf construction work as suggested in the Siebe catalogues of the day.
It was pleasing to find the corselet, brails, faceplate and helmet had the same matching serial number: #14461. Generally it was in good condition but unfortunately it had been a mantelpiece ornament and somebody had buffed all the tinning off, exposing the raw soldered joints. At the time I didn’t realize this had affected its ability to keep out the salt water and during the first dive it leaked like a bloody sieve.
Having no intentions of half fixing the problems I set about removing all parts and fixtures. Taking a hot gas torch to your helmet is a nerve racking experience, but something I could not trust to anybody else. I was able to identify that the side lights were flat hand cut glass, not optically corrected and held in place by red-lead putty and some light cordage. The communications port wiring was set in bee’s wax, having a waterproofing effect as well, but a brass ‘comms’ cap must be used if you cannot attach a surface ‘comms’ line or the water pressure will force the wiring and wax into the helmet. All washers for the face plate, exhaust valve, and corselet were leather of different thicknesses. There were old gasket paper packers under the corselet leather to adjust for the not-so-perfect mating rings.
The interrupted thread was in good condition and just needed cleaning. The front faceplate was bent and the thread damaged (maybe it had been dropped at some stage). This took the most amount of time to repair and involved taking out the glass, and being shown an old trick of using a small wooden flat stick, soft piece of leather and a mixture of metal cutting paste and diesel to gently reform the threads.
I couldn’t get a die to match the damaged ‘comms’ port thread. I was told that the threads were not standard profile and that manufacturers would often set their own to render their gear unusable if it fell into enemy hands. It sounded good anyway. So it was back to the stick paste and diesel. The soldering repairs involved cleaning the brass with a solvent and using a solder stick and gas torch to build up where they had buffed away. I think this is an area that could easily end in tears and recommend some practice before lighting up.
It is easy to overheat the surface and lose more solder than you are putting in. This process also affects the beautiful brass patina finish to the helmet, so if you don’t want to dive with a shiny brass fish lure on your head, then take it slowly.
I also suggest you look at as many pictures as you can and read whatever you can lay your hands on. But this still doesn’t cover it all and you will have to make some uninformed decisions. Putting everything back together didn’t pose any problems and, yes, I did use authentic red-lead paste. So if you get to dive it you don’t have to worry – it sets harder than concrete. New leather washers were all cut by hand and leather spacers were cut to go between corselet and brails. This prevents wings nuts being over tightened and distorting the curves of the brails when helmet is not attached to a suit. I haven’t reset the ‘comms’ in bees wax yet because I need to source a genuine Bakelite speaker for inside the helmet. Currently you can see where it has been broken off its mounting. The one speaker was used for both incoming and out going communications over and above line signals. In the mean time I have just installed a blank brass ‘comms’ cap, with a leather washer to seal it.
My second dive in the helmet wasn’t as wet, but water was still leaking in around the joint between corselet and helmet. I got a standby diver to note where the air was coming out after shutting exhaust and over pressuring the suit. The answer was a simple fix just needing some packing under one side of the neck ring washer. When I was at the Penguin Naval base in Sydney I was told how they check for leaks in the suit. They would put the suit and helmet together, stuff beer bottles down the arm cuffs, then hang the whole lot up by the helmet and fill the lot full of water. This would identify helmet and suit leaks in one hit. There was no way I was going to do that, because I can’t simply go to naval stores for a replacement anymore. And how the hell did you get the beer bottles out – break them?
Currently the things left to do include getting the ‘comms’ up and running. This must be genuine parts though. And I need to try and find an airline regulator valve. My vintage Siebe didn’t have a helmet mounted inlet valve because air volume was controlled by the hand pump attendants on the surface. Not a smart option if you’re using compressed air. I must say I’ve dived helmets with a chin activated exhausts and it makes life easier for the diver that just can’t get the in-gas and the out-gas balanced. I don’t think I will worry about the tinning, the exposed brass makes it look like it’s done some work and I can assure you it won’t be spending to much time on the mantel piece if I can help it.
I would like to thank all the people that helped with parts knowledge and encouragement Des Williams, Jeff Maynard, Mal Venturoni, Rob Conn-the leather guy, The Thread and Die guys from Dandenong, the retired Naval divers from HMAS Penguin NSW, anybody that let me pick their helmet up turn it upside down and take photos and finally to any maritime museum curator that humored me while I went where the public was not supposed to go to obtain any tidbit of information I could get.
Photo and text, Copyright: John Osmond. 2007